
An Apple Distribution certificate is required to distribute an iOS app on the App Store. It is used for code signing, allowing Apple to verify that the app was built by a legitimate developer.
This article walks you through creating the certificate from scratch using the Apple Developer Program dashboard.
Prerequisites
Before creating the certificate, verify the following:
- Enrolled in the Apple Developer Program ($99 USD/year)
- Signed in with an Apple ID that has Admin or Account Holder privileges
- Xcode (latest version recommended) installed on your Mac
- Keychain Access (built-in macOS app) is available
Step 1 — Create a CSR (Certificate Signing Request)
A CSR (Certificate Signing Request) is the file you submit to Apple to request a certificate. You create it using Keychain Access.
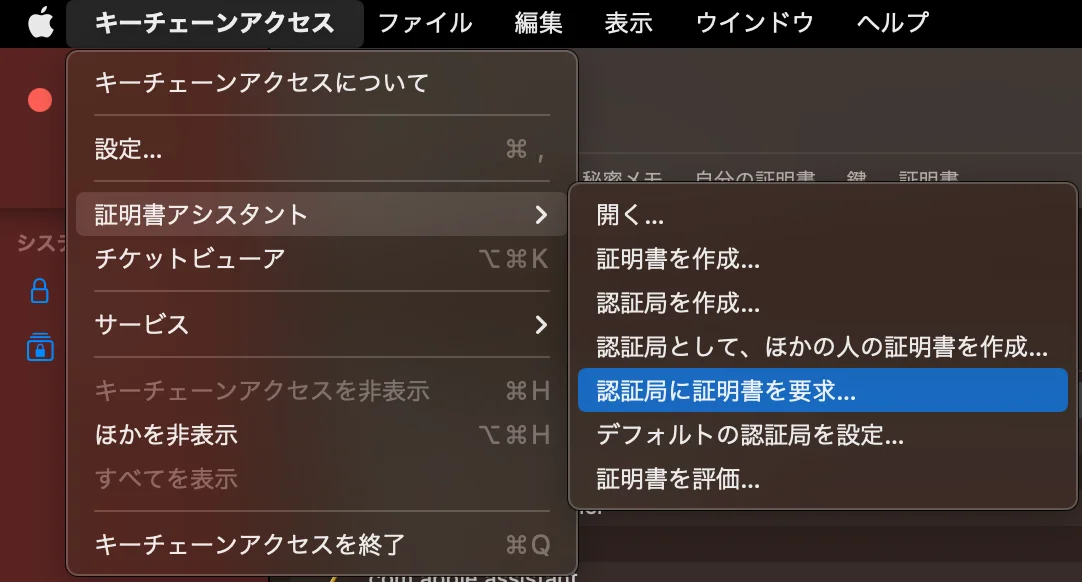
- Open Keychain Access (search "Keychain" in Spotlight)
- In the menu bar, go to
Keychain Access→Certificate Assistant→Request a Certificate From a Certificate Authority...
-
Fill in the fields as follows:
Field Value User Email Address The email address associated with your Apple ID Common Name A recognizable name (e.g., MyApp Distribution)CA Email Address Leave blank Request is Select "Saved to disk"
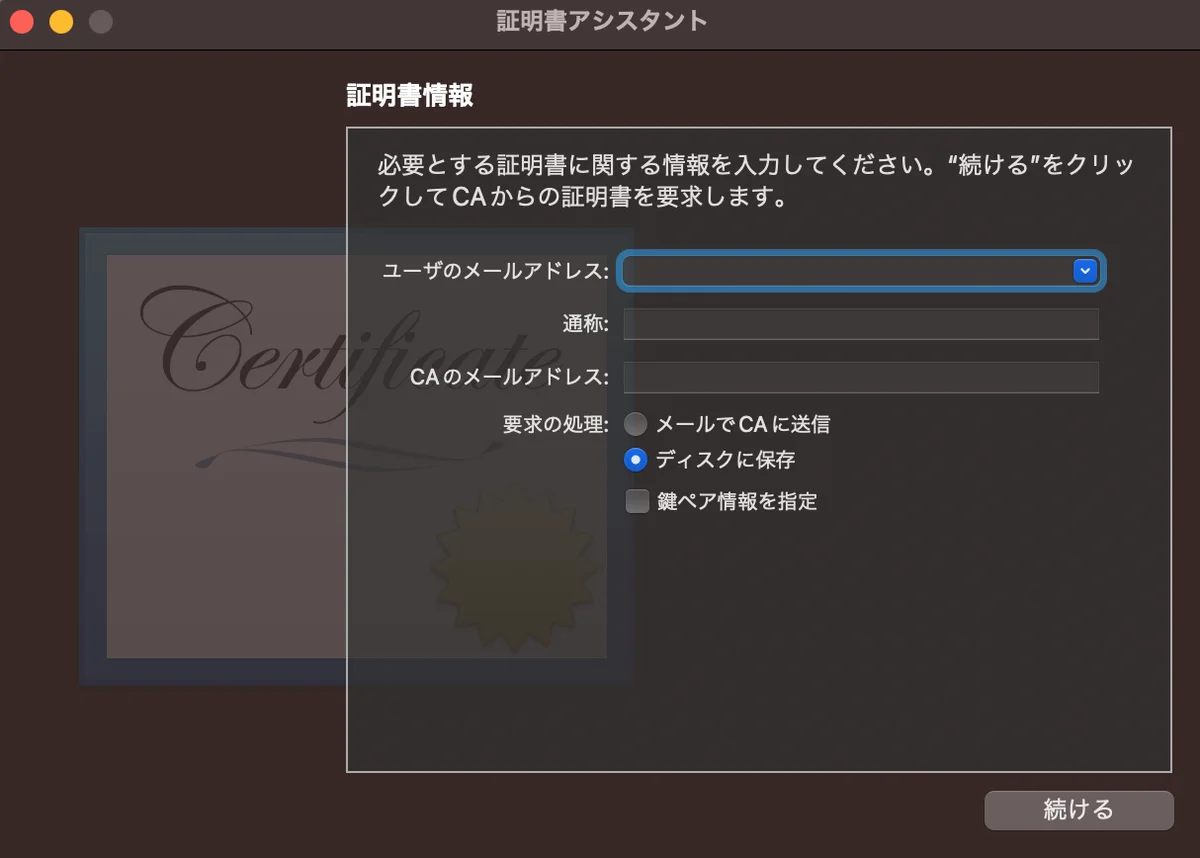
- Click "Continue" and save the CSR file (
.certSigningRequest) to a location of your choice.
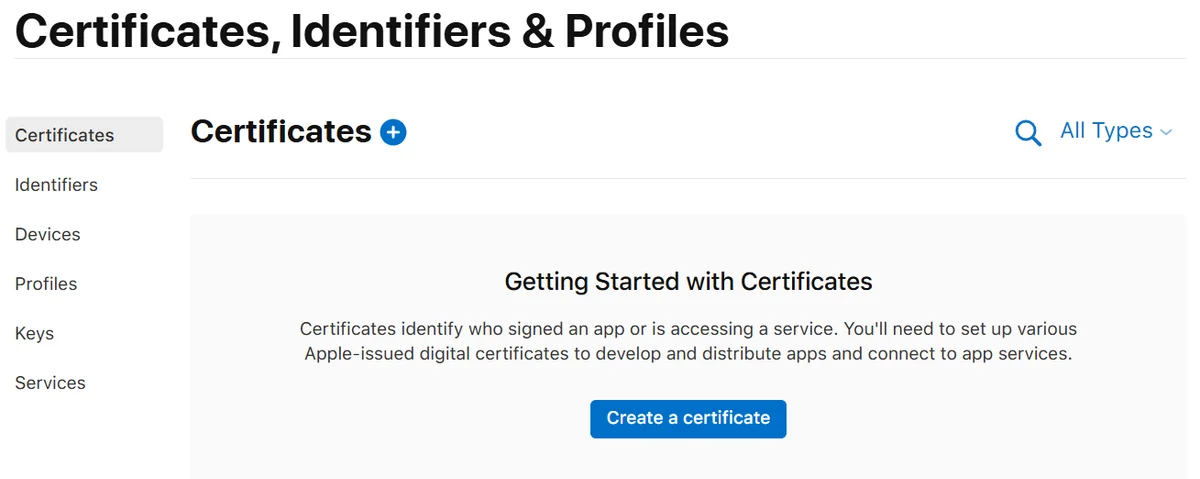
Step 2 — Create a New Certificate on the Apple Developer Portal
Go to the Apple Developer website to issue the certificate.
URL:
developer.apple.com › Account › Certificates, IDs & Profiles › Certificates
-
Click the
+(Add) button in the top right
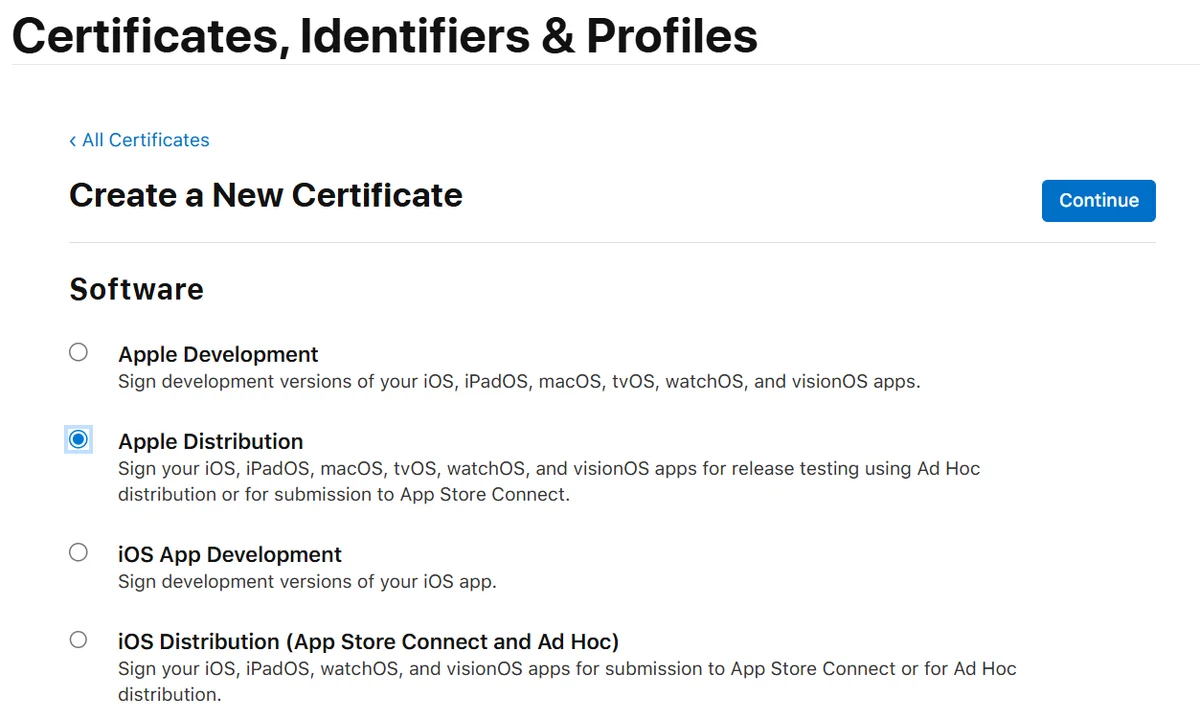
-
Under the Software section, select
Apple Distributionand click "Continue"
-
On the "Upload a Certificate Signing Request" screen, upload the
.certSigningRequestfile you created in Step 1 -
Click "Continue" → "Download" to download the certificate file (
.cer)

Step 3 — Download and Install the Certificate in Keychain
- Double-click the downloaded
distribution.cerfile - When prompted "Add to Keychain?", click "Add"
- Open Keychain Access and check the "Certificates" category in the login keychain
- If
Apple Distribution: [Your Name/Team] (XXXXXXXXXX)is listed, you're done
Click the ▶ expand button to the left of the certificate and confirm that a private key (🔑) appears. If the private key is not visible, the CSR may have been generated on a different Mac, or the private key does not exist in the current Mac's Keychain.
Step 4 — Verify the Certificate is Recognized in Xcode
Location:
Xcode › Settings... › Accounts › Manage Certificates...
- Select the target Apple ID and click "Manage Certificates..."
- Confirm that an
Apple Distributionentry appears in the list - In your project's Signing & Capabilities tab, disabling
Automatically manage signingallows you to manually select the Distribution certificate
Relationship Between Certificates and Provisioning Profiles
Apple's signing system consists of three elements:
- Certificate: Proves which developer or team signed the app
- App ID: Identifies which app it is
- Provisioning Profile: Defines which combination of certificate, App ID, devices, and capabilities is authorized to run or distribute the app
In short, the certificate identifies the signer, the App ID identifies the app, and the provisioning profile is a set of usage conditions. Creating a certificate alone is not enough to distribute an app — you also need a provisioning profile that matches your distribution method.
Differences from the Apple Development Certificate
iOS development uses two types of certificates depending on the purpose. Here is a comparison focused on the nature of the certificates themselves.
| Item | Apple Development | Apple Distribution |
|---|---|---|
| Owner | Individual (Mac name appended to certificate name) | Team (only Account Holder / Admin can create) |
| Use on multiple Macs | ✅ Possible (personal; transfer to another Mac via .p12) |
✅ Possible (team-shareable via .p12 export) |
| Purpose | On-device debugging & testing | App Store / Ad Hoc distribution |
| TestFlight distribution | ❌ Not possible | ✅ Possible |
| Xcode signing | Used for Debug scheme |
Used for Release scheme |
| Maximum issued | 2 per team | 3 per team |
| Validity period | 1 year | 1 year |
The typical workflow is to build and debug using an Apple Development certificate, then archive and sign with an Apple Distribution certificate for release.
Apple Development Certificate vs. Personal Account
A common source of confusion is the distinction between an Apple Development certificate and the Personal Team available with a free Apple Account. These are not the same.
- Apple Development certificate: An official development certificate used by teams enrolled in the Apple Developer Program
- Personal Team: A development workflow that allows on-device testing via Xcode without enrolling in the Apple Developer Program
| Item | Personal Team (free account) | Apple Development (Developer Program) |
|---|---|---|
| Requirement | Apple Account only | Apple Developer Program enrollment required |
| Main use | Personal on-device testing | Team development / continuous development signing |
| Distribution | ❌ Not possible | ❌ Not possible (development use only) |
| TestFlight / App Store Connect | ❌ Not possible | ❌ Not possible |
| Profile validity | 7 days | Typically 1 year |
| Registerable App IDs / Devices | Limited | Available within Developer Program |
| Advanced features / services | Limited | More features available |
The Personal Team for free accounts is convenient for learning and personal experimentation. For App Store distribution, TestFlight, Ad Hoc distribution, or ongoing team development, you need to enroll in the Apple Developer Program and use Apple Development / Apple Distribution certificates.
Distribution Method Reference Table
| Distribution Method | Certificate | Provisioning Profile | Notes |
|---|---|---|---|
| On-device debugging | Apple Development | Development | Only runs on registered devices |
| TestFlight | Apple Distribution | App Store Connect Distribution | Upload to App Store Connect for distribution |
| App Store release | Apple Distribution | App Store Connect Distribution | Public release after review |
| Ad Hoc distribution | Apple Distribution | Ad Hoc | Limited to devices with registered UDIDs |
| Enterprise / In-House | Apple Enterprise Distribution | In-House | Requires Apple Developer Enterprise Program |
A common point of confusion: both TestFlight and App Store publishing use the Apple Distribution certificate. The Apple Development certificate is for development only and cannot be used to upload to App Store Connect.
Automatic Signing vs. Manual Signing
For most use cases, enabling Automatically manage signing in Xcode is recommended. Xcode will automatically manage the Development / Distribution signing assets and provisioning profiles, making it the safest option for individual developers and small teams.
Consider manual signing in the following situations:
- You need strict control over multiple targets or Bundle Identifiers
- You want to explicitly manage signing assets in a CI/CD pipeline
- You use a tool like Fastlane Match to centrally manage certificates and profiles
- Xcode's automatically generated profiles don't give you the control you need
If you're unsure, start with Automatic signing and migrate to manual signing as your CI setup or team complexity grows.
Common Errors and Solutions
🔴 "No private key found for certificate"
This occurs in the following situations:
- Installing
.ceron a different Mac: The private key only exists on the Mac where the CSR was generated - Migrating or replacing your Mac: Migration Assistant may transfer the certificate but not move the private key correctly
- Resetting or repairing Keychain: Even on the same Mac, the private key is lost if Keychain is reset
- Re-downloading
.cerfrom the Apple Developer portal: If downloaded on a different Mac than where the CSR was created
In all cases, export a .p12 file from the original Mac where the CSR was generated and import it on the current Mac. If the original Mac is unavailable or Keychain is corrupted, revoke the certificate and reissue it with a new CSR.
# .p12 export steps (Keychain Access)
# 1. Open Keychain Access
# 2. Right-click the target certificate
#    → Select "Export 'Apple Distribution: ...'"
# 3. Set a password and save the .p12 file
# 4. Double-click on the other Mac to import
🔴 Certificate Expired
Apple Distribution certificates are valid for 1 year. If expired, create a new certificate using the same steps. Old certificates can still be used to verify already-archived builds.
Before renewing, follow this order to avoid issues:
- Create a new Apple Distribution certificate
- Regenerate Distribution provisioning profiles if needed
- Update the certificate and profile used in Xcode or CI/CD
- If shared with your team, redistribute the new
.p12to the necessary Macs
If you're using CI, updating just your local Mac won't restore the build. Identify all locations where the certificate is stored and used before swapping it out.
🔴 "Maximum number of certificates generated" Error
The Apple Developer Program allows a maximum of 3 Distribution certificates to be issued. Delete any unnecessary certificates before creating a new one.
Summary
- Generate a CSR (
.certSigningRequest) using Keychain Access - Create a new
Apple Distributioncertificate at developer.apple.com and upload the CSR - Double-click the downloaded
.certo install it in Keychain - Verify the certificate is recognized in Xcode's Accounts settings
Certificate management can seem complex at first, but once you've done it a few times it becomes straightforward. For team development, consider exploring secure .p12 sharing practices or automation tools like Fastlane Match.
Reference Links (Apple Official)
- Certificates – Apple Developer: Certificate creation and management
- Choosing a Membership – Apple Developer: Differences between free accounts and the Developer Program
- What is app signing? – Xcode Help: Certificate types and overview
- Signing & Capabilities workflow – Xcode Help: How Automatic signing works
- Create, export, and delete signing certificates – Xcode Help: Certificate operations in Xcode
- Distribute your app – Apple Developer: Official guide for app distribution
- TestFlight – Apple Developer: Official guide for beta distribution with TestFlight