
Introduction
To use a domain registered with Amazon Route 53 on Amazon CloudFront, you first check the hosted zone on the Route 53 side, then issue an SSL certificate in AWS Certificate Manager (ACM), and finally configure the custom domain in CloudFront.
In this article, we assume a setup where the origin for the apex domain and the origin for the subdomain are different, and explain how to assign each one to a separate CloudFront distribution.
Prerequisites
This article assumes the following setup.
- The apex domain and the subdomain use different origins
- The CloudFront distribution for the apex domain and the one for the subdomain are operated separately
- The basic configuration of the CloudFront distributions and their origin servers is already complete
- The Route 53 hosted zone is managed in the same AWS account
If you use the same origin for both, you can also choose a configuration where multiple alternate domain names (CNAMEs) are set on a single CloudFront distribution. This article does not cover that case.
Overall Flow
- Purchase a domain in Amazon Route 53
- Check the automatically created hosted zone in Amazon Route 53
- Issue an SSL certificate in AWS Certificate Manager (ACM)
- Configure the custom domain in Amazon CloudFront
- Create the record for the apex domain in Amazon Route 53
- Create the record for the subdomain in Amazon Route 53
- Verify the setup
Relationship Between ACM, Route 53, and CloudFront
In this setup, Amazon Route 53 manages DNS, AWS Certificate Manager (ACM) issues the certificate for HTTPS, and Amazon CloudFront serves traffic for the apex domain and the subdomain.
graph LR
  U[User Browser]
  R[Route 53 DNS Management]
  CM[CloudFront for Apex Domain]
  CS[CloudFront for Subdomain]
  OM[Origin S3 or Web Server]
  OS[Origin S3 or Web Server]
  A[ACM SSL/TLS Certificate]

  U -->|Access example.com| R
  U -->|Access cdn.example.com| R
  R -->|A / AAAA Alias| CM
  R -->|A / AAAA Alias| CS
  CM -->|Serve over HTTPS| U
  CS -->|Serve over HTTPS| U
  A -->|Attach certificate| CM
  A -->|Attach certificate| CS
  CM -->|Fetch content| OM
  CS -->|Fetch content| OS
The key point is that the DNS records in Amazon Route 53 reference the CloudFront distributions for the apex domain and the subdomain, and by configuring an ACM certificate on each distribution, you can deliver your site over HTTPS on your own domain.
1. Purchase a Domain in Amazon Route 53
First, open Amazon Route 53 from the AWS Management Console and purchase the domain you want to use.
Steps
- In the Amazon Route 53 dashboard, open "Registered domains" or "Domain registration"
- Search for the domain name you want to register (example:
example.com)
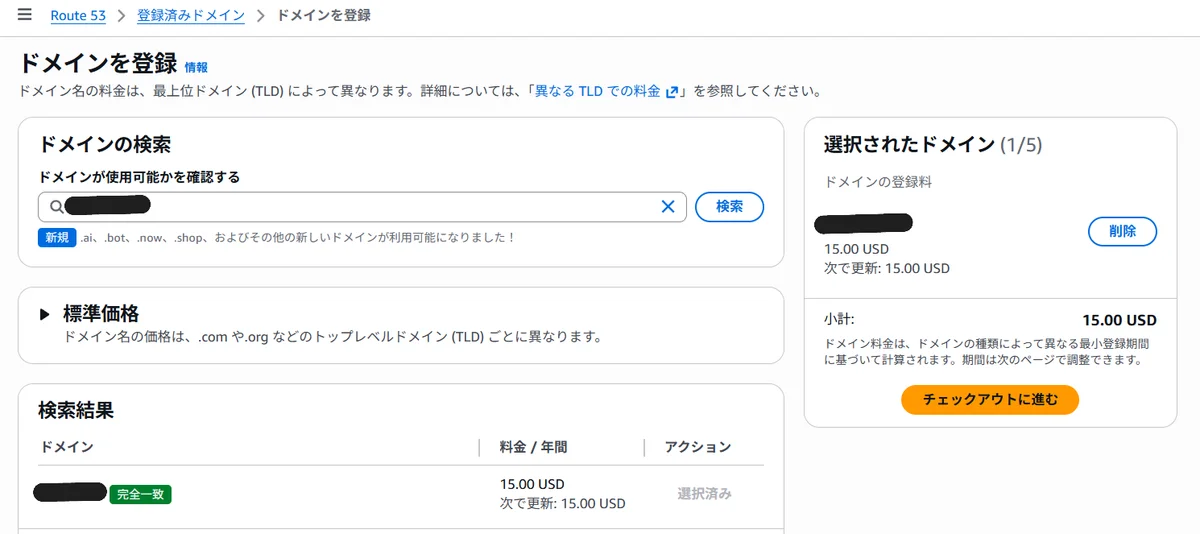
- If it is available, add it to your cart and proceed with the purchase
- Enter your contact information and registration period, then complete the purchase
- Open the confirmation email sent to your registered email address and click the verification link in the message
- Example subject:
Verify your email address.
- Example subject:
- In the Amazon Route 53 console, open "Domains" → "Requests" and confirm that the status of the newly requested domain is "Successful"
Once the purchase is complete, the domain registration is done and Amazon Route 53 will also be able to manage its name servers.
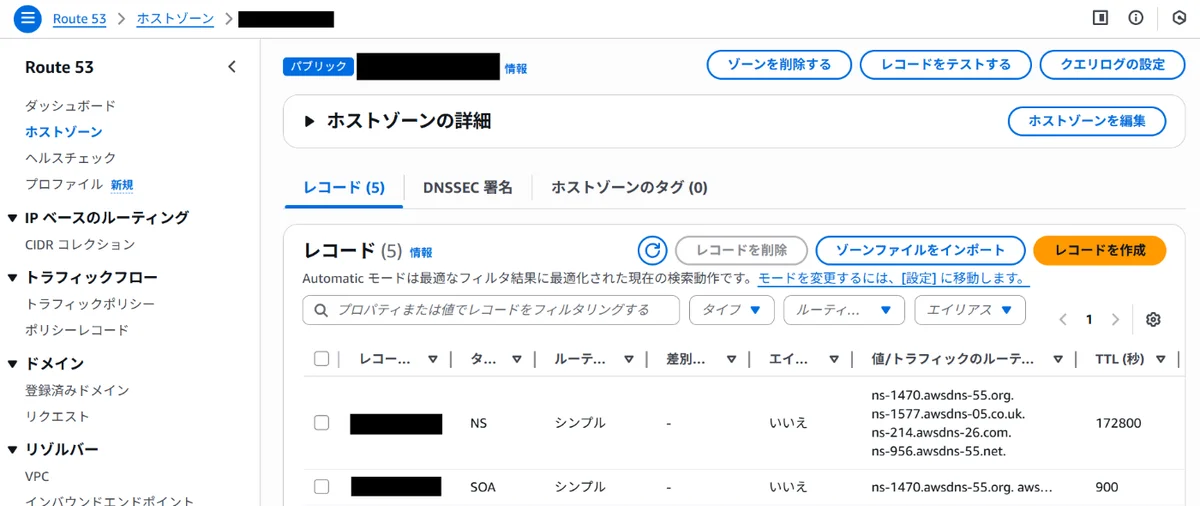
2. Check the Automatically Created Hosted Zone in Amazon Route 53
When you register a domain in Amazon Route 53, a public hosted zone with the same name is usually created automatically. Start by checking its status.
Steps
- In the Amazon Route 53 dashboard, open "Hosted zones"
- Confirm that there is a hosted zone with the same name as the purchased domain (example:
example.com) - Confirm that the following records were created automatically in the hosted zone
NS
SOA
If necessary, also check the name servers listed in the NS record.
ns-xxx.awsdns-xx.com
ns-xxx.awsdns-xx.net
ns-xxx.awsdns-xx.org
ns-xxx.awsdns-xx.co.uk
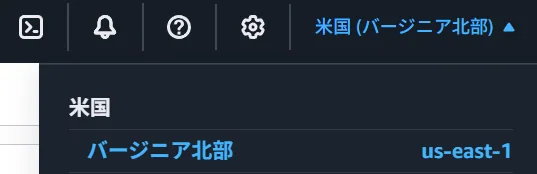
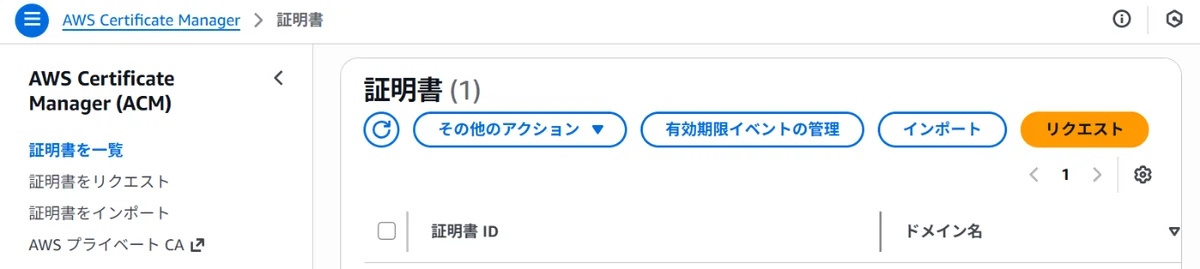
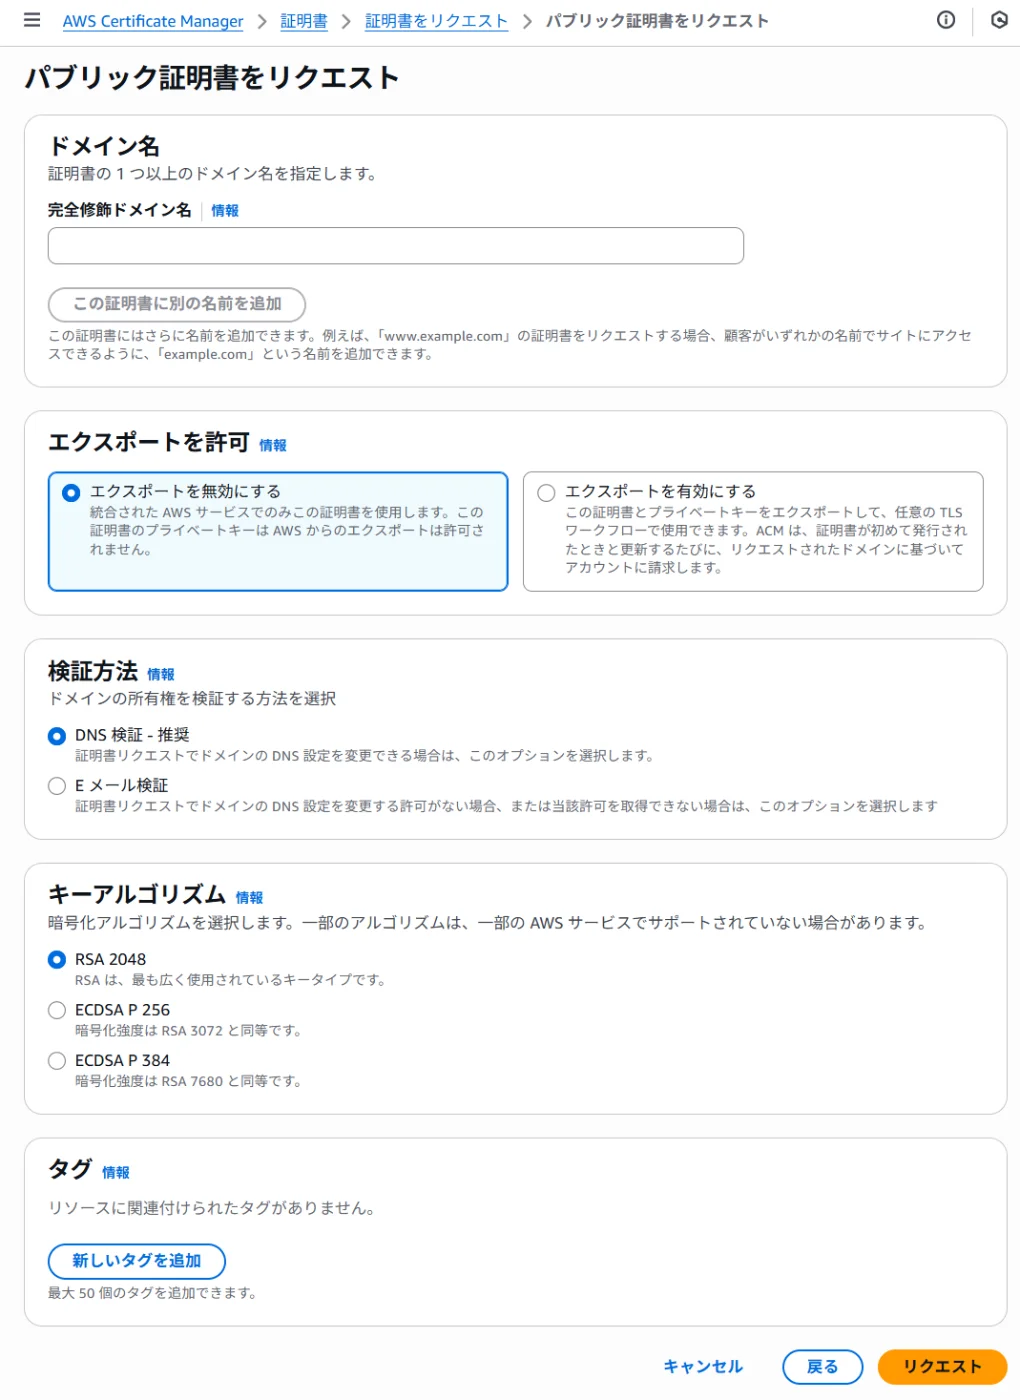
3. Issue an SSL Certificate in AWS Certificate Manager (ACM)
To make the site accessible over HTTPS, issue an SSL certificate in AWS Certificate Manager (ACM).
Steps
- Change the Region to us-east-1
- In the ACM console, click "Request a certificate"
- Select "Request a public certificate"
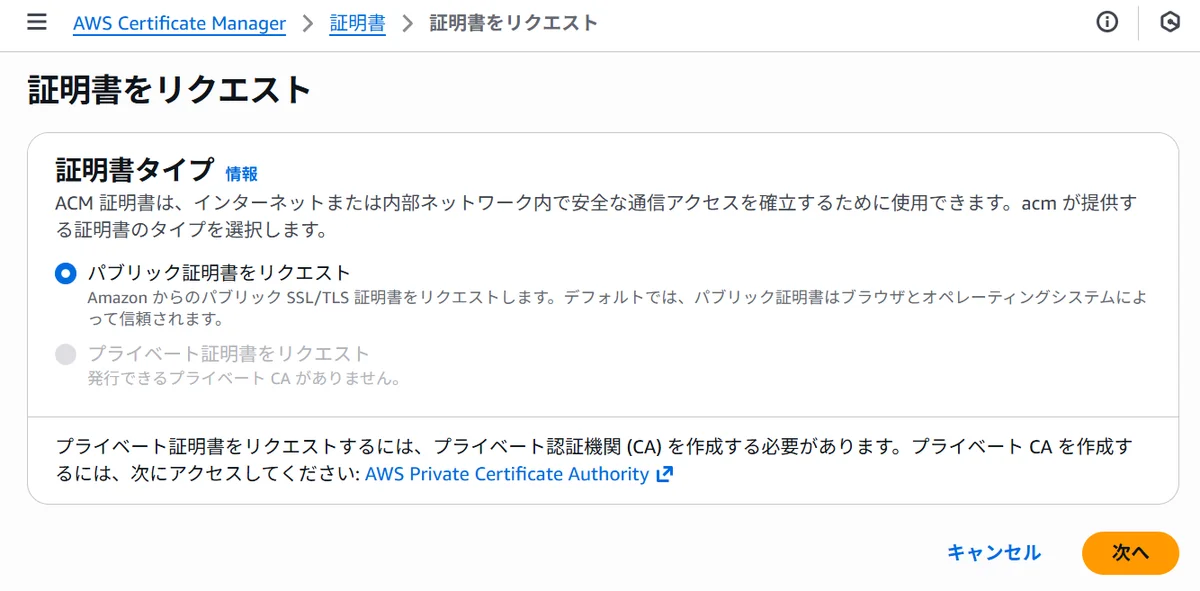
- Enter the domain names you want to use in the fully qualified domain name field
- If you use the apex domain:
example.com - If you use subdomains:
*.example.com - If you want one certificate to cover both: add both
example.comand*.example.com
- If you use the apex domain:
- Choose "DNS validation" as the validation method
- Click "Request"
Complete DNS Validation
- On the certificate details page, click "Create records in Route 53"
- If the Route 53 hosted zone is managed in the same AWS account, you can create the CNAME records automatically
- If the automatic creation flow is not shown, manually add the CNAME records displayed by ACM to Route 53
- After a few minutes, validation completes
Once validation is complete, the status changes to "Issued".
4. Configure a Custom Domain in Amazon CloudFront
After the certificate has been issued, add the custom domain to the CloudFront distribution.
Steps
- In the CloudFront console, select the distribution for the apex domain
- Click "Edit"
- Add the domain you want to use under "Alternate domain name (CNAME)"
- Add
example.comto the distribution for the apex domain
- Add
- Under "Custom SSL certificate", select the certificate you created earlier
- Click "Save changes"
- Next, repeat the same steps for the distribution for the subdomain
- Add
cdn.example.comto the distribution for the subdomain - Confirm that the certificate you use includes
cdn.example.comor*.example.com
- Add
- Click "Save changes"
Wait a few minutes to about 15 minutes for deployment to complete for each distribution.
5. Create the Apex Domain Record in Amazon Route 53
If you also want example.com to point to CloudFront, create A/AAAA alias records.
Steps
- In the hosted zone details page in Amazon Route 53, click "Create record"
- Enter the following information:
- Record name: leave blank (root domain)
- Record type: A - IPv4 address
- Alias: On
- Route traffic to:
- Alias to CloudFront distribution
- Select the CloudFront distribution for the apex domain
- Click "Create records"
- In the same way, also create an AAAA - IPv6 address record
6. Create the Subdomain Record in Amazon Route 53
Create the record that points the subdomain (example: cdn.example.com) to CloudFront.
Steps
- In the hosted zone details page in Amazon Route 53, click "Create record"
- Enter the following information:
- Record name: subdomain (example:
cdn) - Record type: A - IPv4 address
- Alias: On
- Route traffic to:
- Alias to CloudFront distribution
- Select the CloudFront distribution for the subdomain
- Record name: subdomain (example:
- Click "Create records"
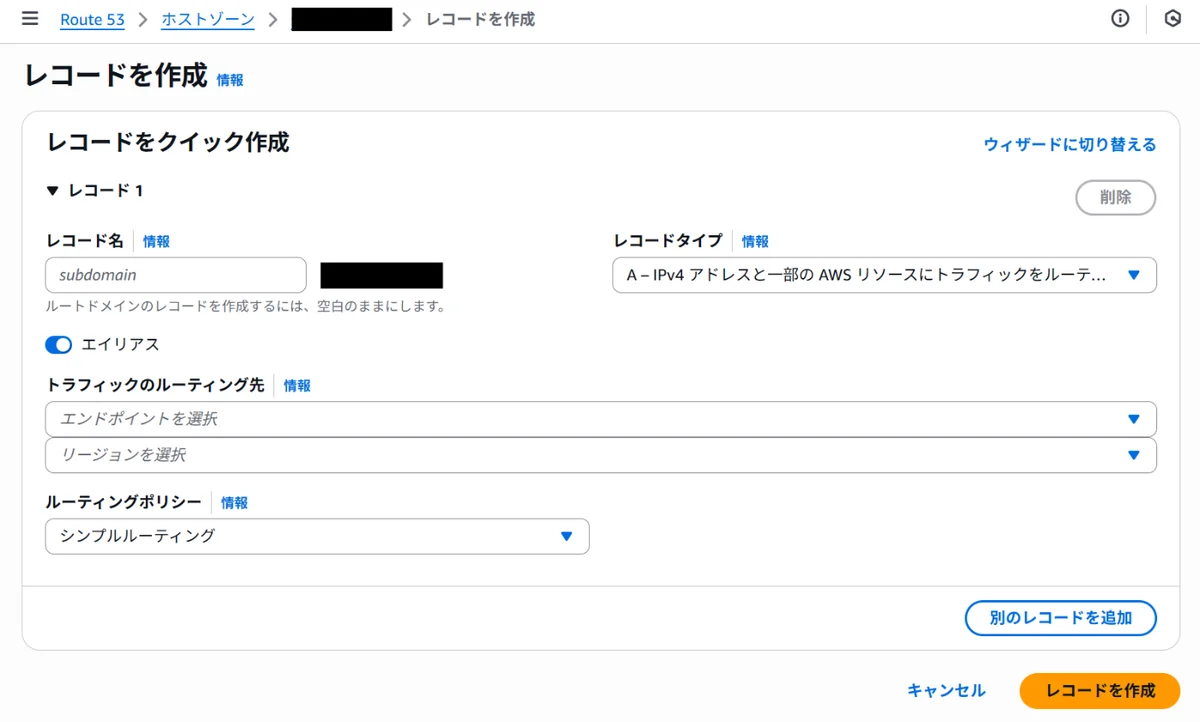
- Also create the following record in the same way.
- Record type: AAAA - IPv6 address
- Same as step 2 for the other fields
7. Verify the Setup
After all configuration is complete, access the following URLs in a browser to verify the behavior.
https://example.com
https://cdn.example.com
If the content from the expected origins is displayed for each, the basic routing is working correctly.
1. Check DNS
Use the following commands to confirm that the apex domain and subdomain point to CloudFront.
nslookup example.com
nslookup cdn.example.com
The CloudFront domain name itself will not be returned, but you can confirm that name resolution works and that the alias records in Route 53 are configured correctly.
2. Check the HTTPS Response
Next, verify that HTTPS responds correctly.
curl -I https://example.com
curl -I https://cdn.example.com
At minimum, check the following.
- The expected HTTP status is returned, such as
HTTP/1.1 200 OKor301 Moved Permanently server: CloudFrontis included- The redirect goes to the intended destination
3. Check the Certificate and Alternate Domain Names
Access each URL in a browser and confirm the certificate subject and the lock icon.
- No certificate error appears on
example.com - No certificate error appears on
cdn.example.com - There is no redirect to an unintended domain
4. Verify That Origins Are Split Correctly
If you use separate origins for the apex domain and the subdomain, also confirm that each one points to a different delivery destination.
- The content from the apex-domain origin is displayed on
https://example.com - The content from the subdomain origin is displayed on
https://cdn.example.com - Updates on one side do not appear on the other
Troubleshooting
If you cannot access the site:
- Confirm that CloudFront deployment has finished
- Confirm that the A/AAAA alias records in Route 53 are configured correctly
- Confirm that the target domain has been added to "Alternate domain name (CNAME)" in CloudFront
- Confirm that the ACM certificate includes
example.comorcdn.example.com - Confirm that the ACM certificate status is "Issued"
- Confirm that Host header handling or HTTPS redirect settings on the origin side are not causing the problem
- Check DNS propagation (
nslookup example.com/nslookup cdn.example.com)
Summary
This article explained how to use a domain registered with Amazon Route 53 on Amazon CloudFront. The key points are as follows.
- A domain registered with Amazon Route 53 usually does not require any name server changes
- If the domain supports privacy protection, you can prevent personal information from being exposed in WHOIS
- Issue the ACM certificate first, then configure the custom domain in CloudFront
- If the apex domain and subdomain use separate origins, it is easier to manage them with separate CloudFront distributions
- Link the apex domain and subdomain to CloudFront with their own A/AAAA alias records
- Always create the ACM certificate in the us-east-1 Region
With this setup, you can achieve fast content delivery and flexible DNS management.